Lesson 48
Translation made by MARION


Supplies.
Plugins
Plugins ----FM Tile Tools Blend Embossing
PhotoAgingKit-PhotoFrame.
*****
Material
.
Siertubes come from scraps set.
Put the tubes in a folder of choise
Open the mask FrameMB24 - in your psp and minimize
Color Palette
Set your Foreground color to color ---#7d0000---Set your Background color to color #ff0000

1.
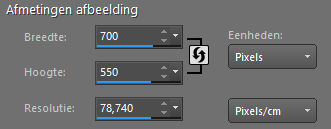
File---Open a new transparent image in this size :
700--- 550 ---Pixels
2.
Activate Flood Fill Tool --- Flood fill the layer with the foreground color
3.
Layers---New raster layer --- Flood fill the layer with the background color #ff0000.
4.
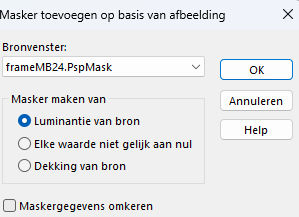
Layers - New mask layer - From image - Select mask--- FrameMB24.
5.
Layers---Merge---Merge Group
6.
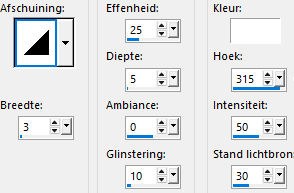
Effects---3D-Effects---Inner Bevel---with this setting.
Number 1---3-----25---5---0---10---white---50---30
Effects---Edge Effects---Enhance
7.
Open the---Tube roos20.
Edit---Copy --- Activate your work --- Edit ---Paste as new layer
8.
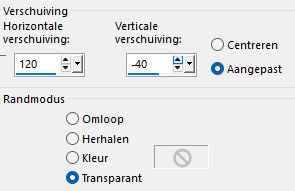
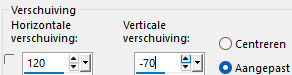
Effects---Image Effects---Offset---120---min 40
Adjust---Sharpness---Sharpen More
9.
Layers---Duplicate
Effects---Artistic Effects---Topography---40---20---50---Color white
10.
Effects----Edge Effects----Enhance
Layers---Arrange---Move Down
11.
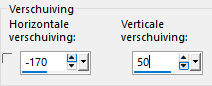
Effects---Image Effects---Offset---min---15---25
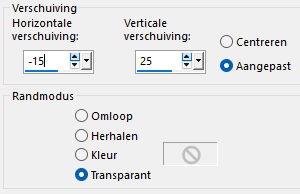
Layers---Properties---Reduce the opacity of this layer to 70%
12.
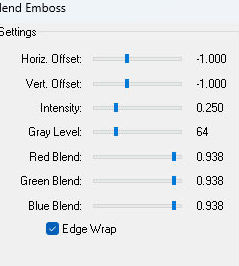
Effects---Plugins--- FM TileTools-Blend Emboss using the default settings
13.
Open the tube --- ring.png--- Edit---Copy --- Activate your work --- Edit ---Paste as new layer
Layers---Arrange---Bring to Top
Move the tube to the top left---( See finished image)
14.
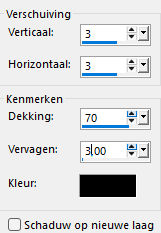
Effects---3D-Effects---Drop Shadow ---3---3---70---3---Color black
15.
Layers---Duplicate
Effects---Image Effects---Offset---120---min 40
16.
Open the Tube--butterflies.png--- Edit---Copy --- Activate your work --- Edit ---Paste as new layer
Effects---Image Effects---Offset---min 170---50
Effects---Edge Effects---Enhance.
17.
Activate the bottom layer in the layer palette ( raster 1)
18.
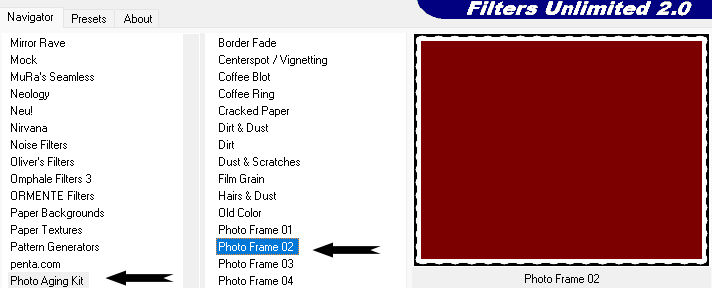
Effects---Filter in Unlimited ---Filter Photo Aging Kit----Select Photo Frame 2--and Ok
19.
Activate your Magic Wand - Tolerance at 20 and Feather at 0
Use your magic wand to click in the white border several times so that the whole border is selected.
20.
Layers ---New raster layer
Flood fill the selection with the red color #7d0000.
Layers---Properties---Reduce the opacity of this layer to 50%
21.
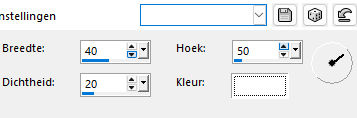
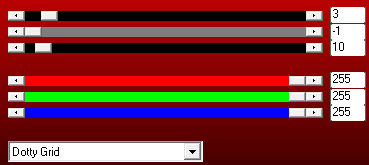
Effects---Plugins---AP 01 (Innovations)-lines-Silverlining---
Dotty Grid---3---min1---10----3x 255
22.
Effects---Edge Effects---Enhance
Selections---Seelct none
23.
Image---Add borders--- 5 pixels---Color black
24.
Layers---New raster layer
Add your watermark
Save as JPG
Have fun with this lesson
Greetings Mieke
Examples
created by Kamalini. and Hennie


|