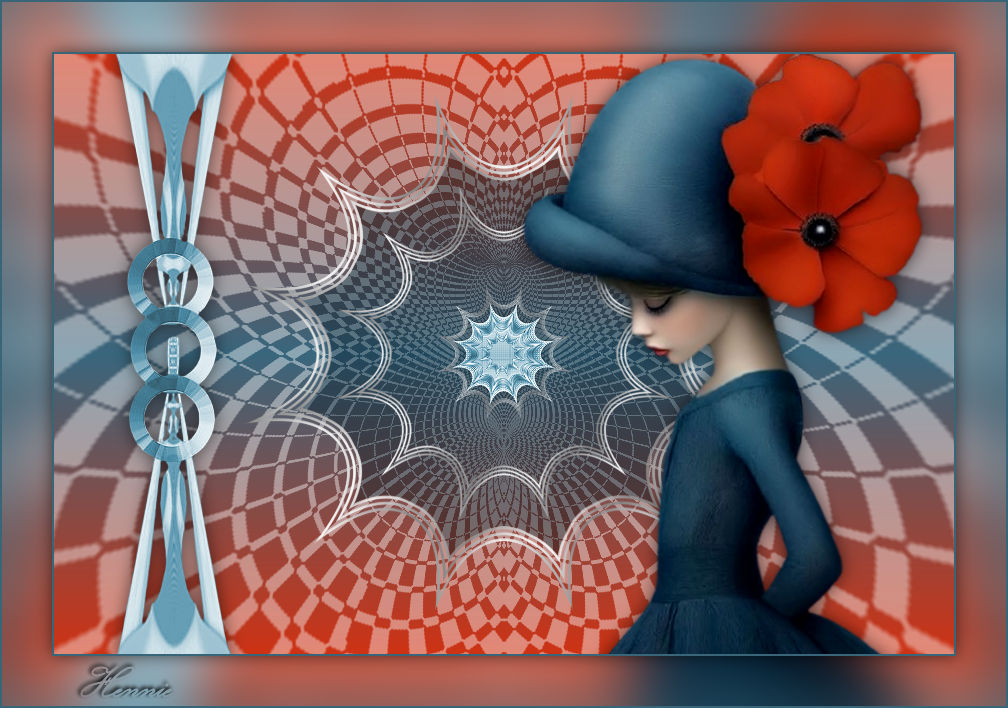
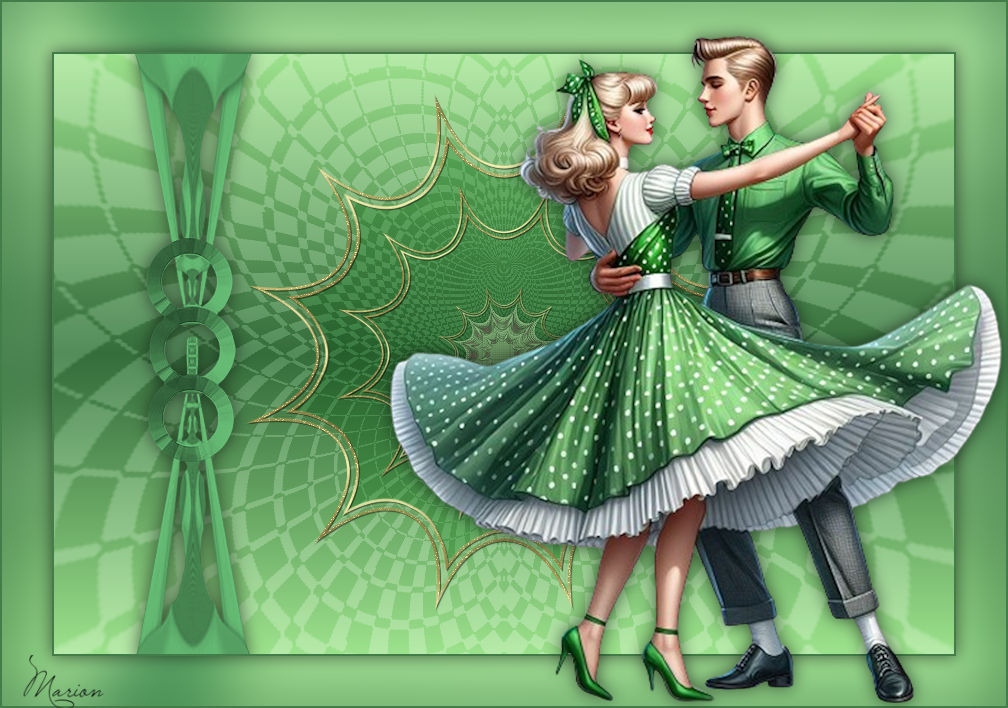
Lesson-290
Translation made by MARION


Materials

Put the selections in your selections folder
Place the silver pattern in the Psp pattern folder.
Plugins
Filter---Flaming Pear---Flexify 2 (The image is included in the zip file)
Colors
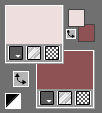
Material Properties ---Foreground color #eddede---Background color # 8e5254
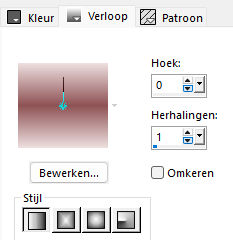
Replace your foreground with a foreground/background linear gradient configured like this---0-1----
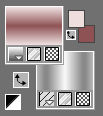
Background on Pattern---select ---
gabriel-zilver.bmp with these settings

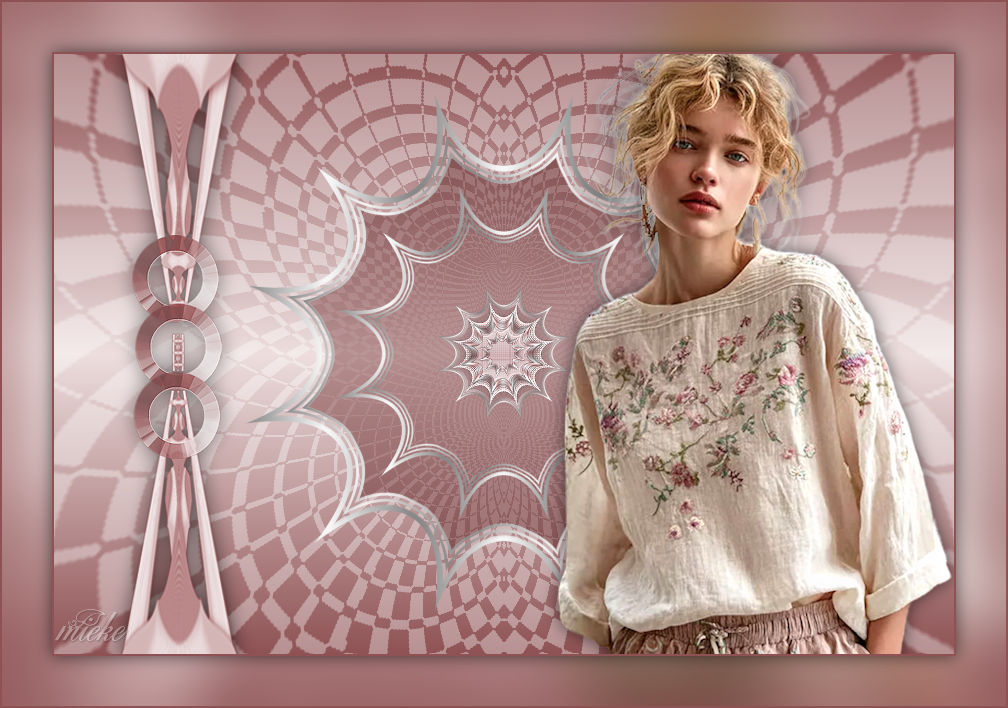
The material looks like this:
File---Open a new transparent image in this size :
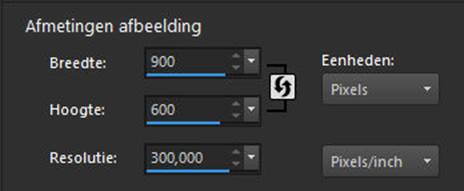
1.
Width ---900--- Height ---600 pixels
Activate Flood Fill Tool – Fill the layer with the gradient 2.
Open---tube deco-1-290.jpg
Edit ---Copy
Activate your work ---Edit --- Paste as new layer
3.
Effects---Plugins ---Flaming Pear---Flexify 2---Input---equirectangule---Output---hyperbolic---rest default settings
(The image is included in the zip file).

4.
Effects---Edge Effects---Enhance More
5.
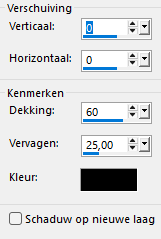
Layers---Properties---Set the blend mode to " Screen " --- Reduce the opacity of this layer to ---81%
6.
Selections –load/save selection –load selection from disc and select my selection: --- STER-MB-GROOT-2025.PspSelection
Layers---New Raster Layer
7.
Activate Flood Fill Tool ---Fill the selection with the background pattern ---gabriel-zilver
Selections---Modify---Contract--- 3 pixels
Click delete on the keyboard
Selections---Modify---Contract--- 3 pixels
8.
Activate Flood Fill Tool ---Fill the selection with the background pattern ---gabriel-zilver
Selections---Modify---Contract --- 3 pixels
Click delete on the keyboard
Selections---Modify---Contract --- 3 pixels
9.
Activate Flood Fill Tool ---Fill the selection with the background pattern ---gabriel-zilver
Selections---Modify---Contract --- 3 pixels
Click delete on the keyboard
10.
Layers ---New raster Layer
Activate Flood Fill Tool ---Fill the selection with the background color
Layers---Properties---Set the blend mode to " Multiply" --- Reduce the opacity of this layer to ---50%
Layers---Arrange---Move Down .
11.
Selections---Select none
12.
Activate the top of the layer palette
Layers---Duplicate
Image---Resize 65% ---Resize all layers not checked.
Layers---Duplicate
Image---Resize 40% ---Resize all layers not checked.
13.
Open---the tube deco-2-290.jpg
Edit---Copy
Activate your work ---Edit - Paste as new layer
14.
Open---the tube deco-3-290.jpg
Edit---Copy
Activate your work ---Edit - Paste as new layer Move the tube to the left ( see finished image)
15.
Effects---3D-effects---Drop Shadow ---0-0-60-25.
16.
Open---the tube ---- vrouw-AI--290.jpg
Edit ---Copy
Activate your work ---Edit - Paste as new layer
Put the tube in a nice place
Drop shadow at your discretion.
17.
Image --- Add Borders---Symmetric checked —2 pixels --- Dark color
Edit---Copy !!
Selections---Select All
Image --- Add Borders---Symmetric checked—50 pixels --- Color doesn't matter.
Selections---Invert
Edit---Paste into selection.
Adjust---Blur---Gaussian Blur---Radius 30.
Selections---Invert
Effects---3D-effects---Drop Shadow ---0-0-60-25.
18.
Image --- Add Borders---Symmetric checked—2 pixels --- Dark color
Selections---Select none.
19.
Add your watermark on a new layer
Save as JPG

|