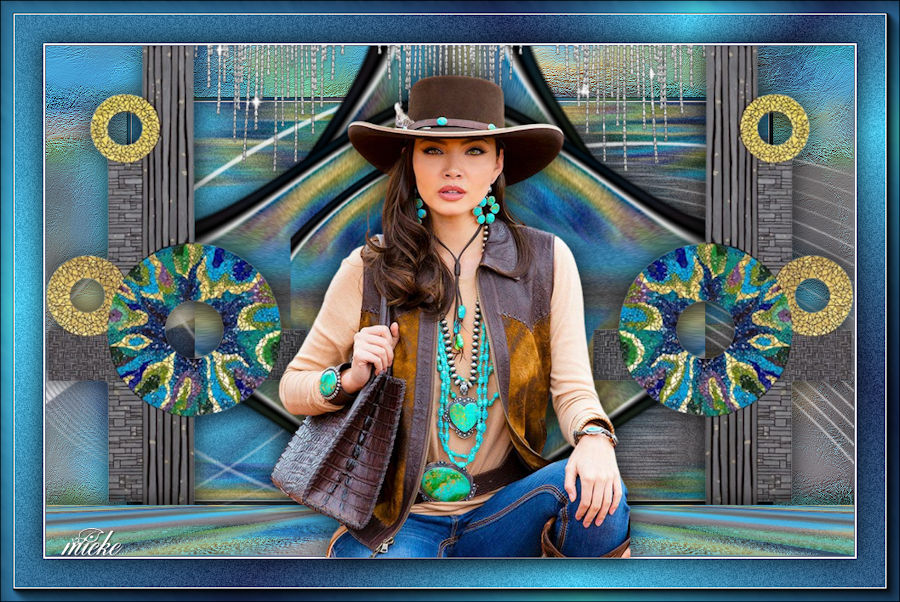
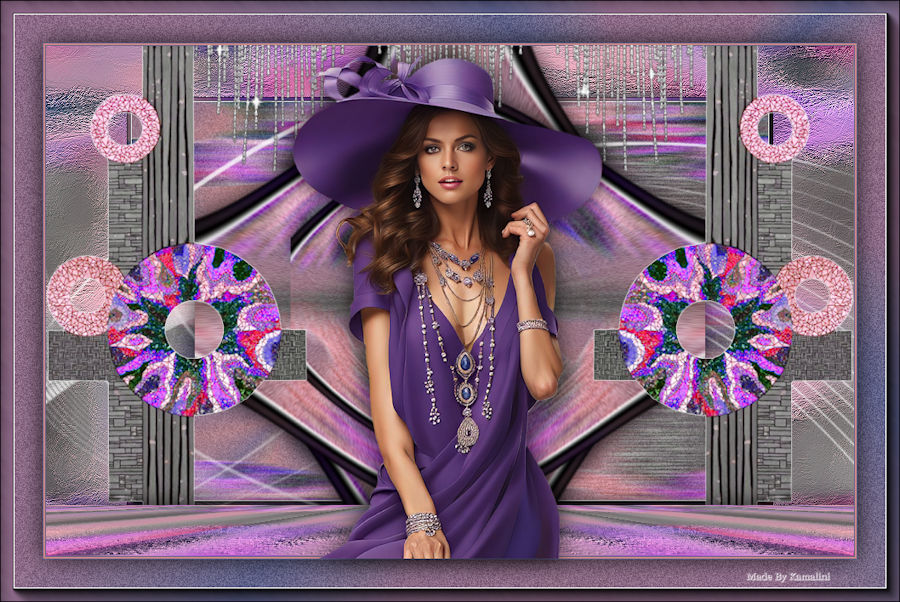
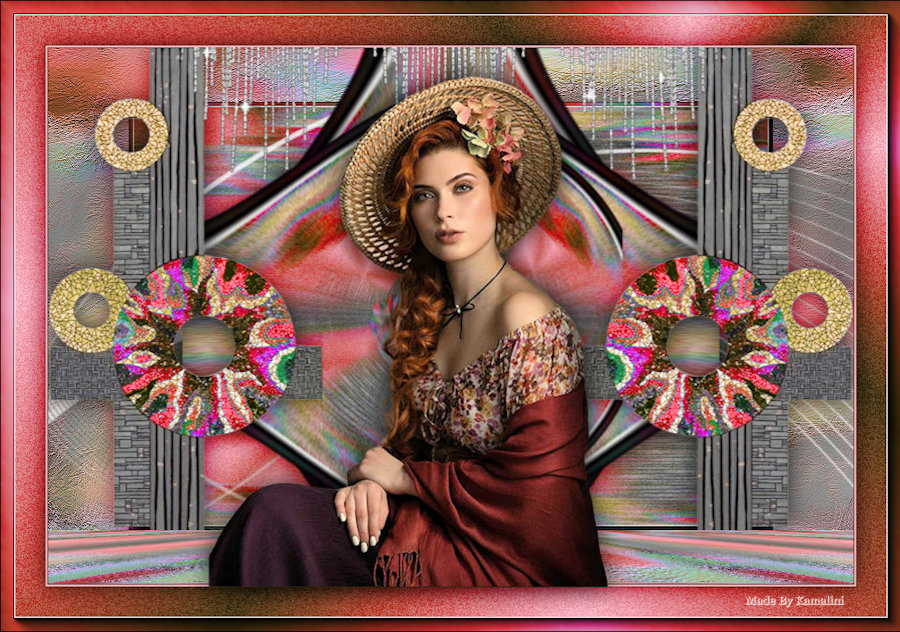
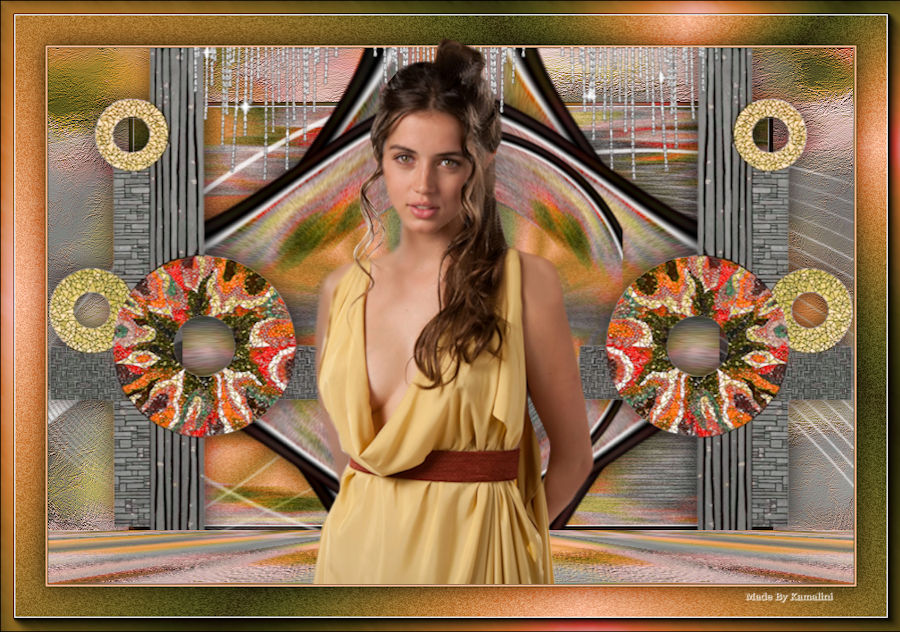
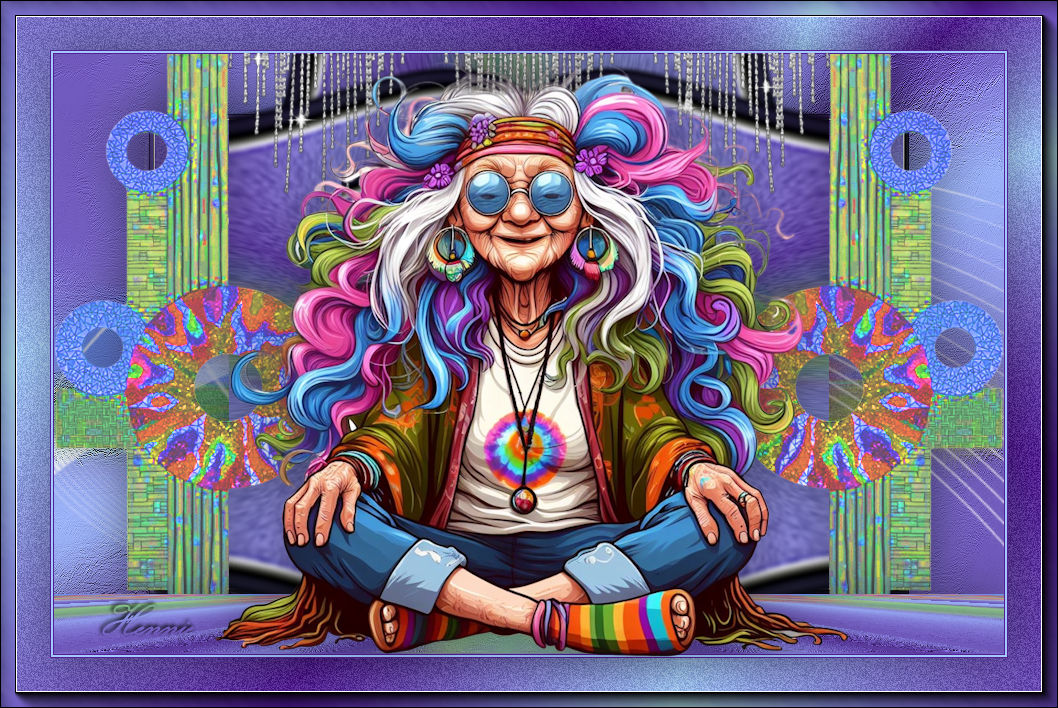
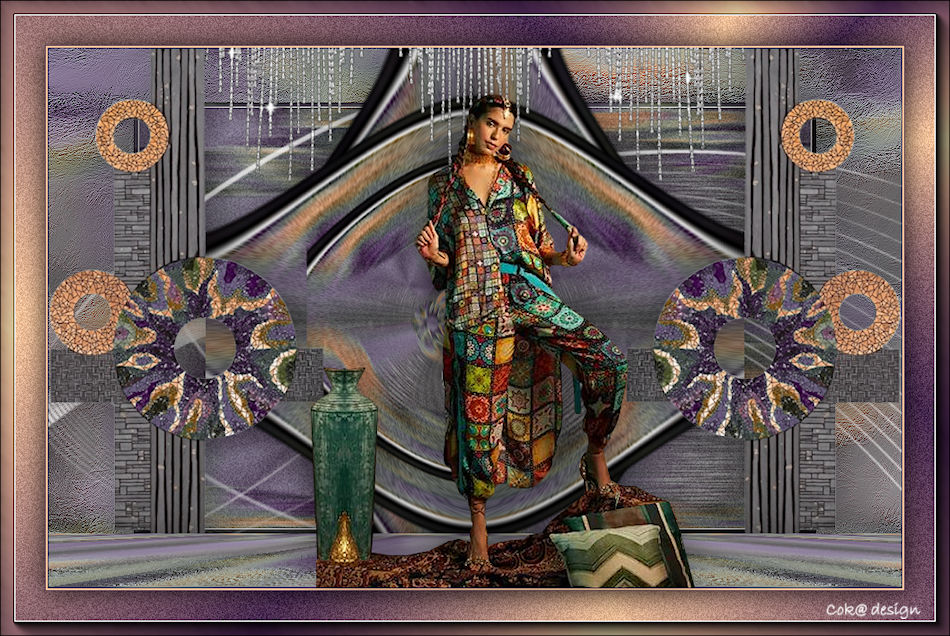
Lesson-280
Translation made by MARION


Hier vind je haar blog.
Madaya mijn dagboek en hobby (seniorennet.be)
Supplies

Filters
filter---AAA Frames---Foto Frame
filter---Flaming Pear---Flexify 2---
Material Properties:
Set your Foreground color to color #22335d--- Set your Background color to color #4bc9ef
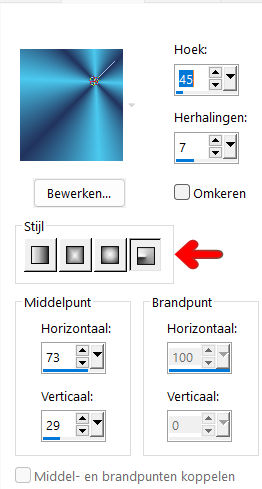
Replace your Foreground color with a Foreground/Background Radial gradient configured like this
Angle 45---Repeats 7---Center point—Horz 73---Vert 29.
1.
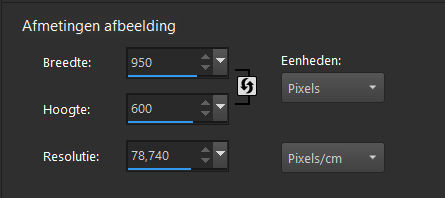
File-Open a new transparent image of this size
Image dimensions.---Width---950---Height---600 Px.
Flood fill tool – flood fill the layer with the gradient
2.
Layers---Duplicate
3.
Image - Mirror - Mirror Horizontal (Image - Mirror in older versions of PSP)
Image - Mirror - Mirror vertical ( Image - Flip in older versions of PSP)
Layers Properties-Reduce the opacity of this layer to 50%.
Layers- Merge- Merge Down
4.
Selections---Select All
5.
Open the tube ---Deco--- deco-19h.png
Edit- Copy
Activate your work –
Edit - Paste into selection
Selections---Deselect All
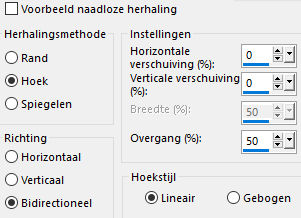
Effects- Image Effects- Seamless Tiling using the default settings
6.
Effects--- Distortion Effects---Wind---Wind direction- From Left---Windstrength 100%
Effects--- Distortion Effects---Wind--- Wind direction- From right--- Windstrength 100%
7.
Adjust---Add /Remove Noise---Add Noise---Uniform---20---Monochrome checked.
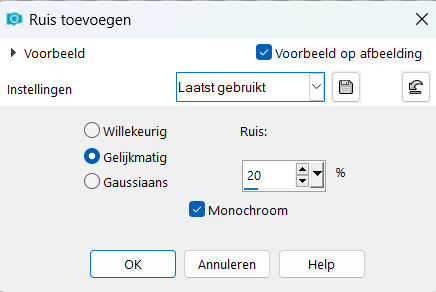
8.
Layers---Duplicate
9.
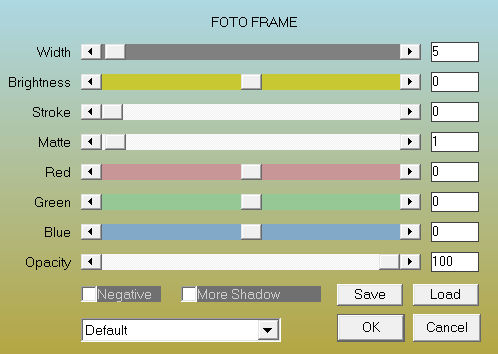
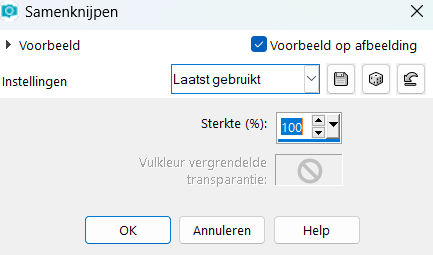
Effects---Plugins--- AAA Frames---Foto Frame---5—0—0—1—0—0—0—100---use the settings below
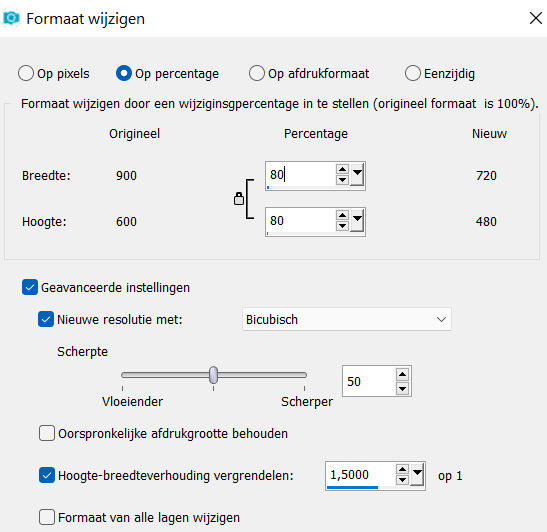
10.
Image Resize 80%--- Resize all layers unchecked.
11.
Layers---Duplicate
12.
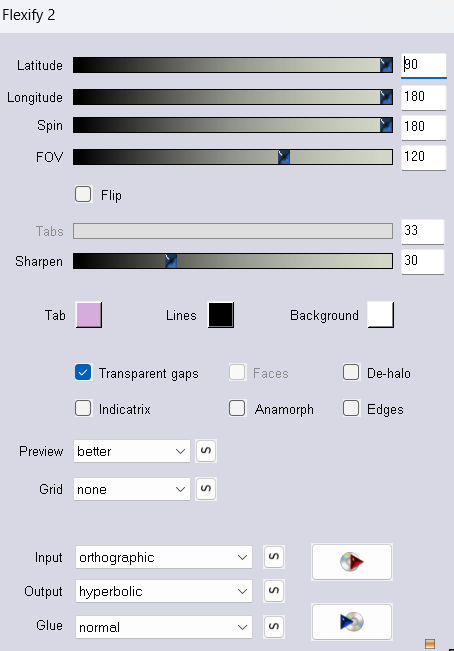
Effects--Plugins---Flaming Pear---Flexify 2---90---180---180---120---33---30---Input---orthographic---Output---hyperbolic---rest default.
13.
Layers---Duplicate.
Repeat---Layers---Duplicate
Image - Mirror - Mirror vertical ( Image - Flip in older versions of PSP)
Layers- Merge- Merge Down
14.
Effects---Distortion Effects---Pinch---100 %
15. In the layers palette----activate copy (2) of raster 1
Layers- Arrange- Bring to Top
Image Resize 80%--- Resize all layers unchecked.
Repeat : Image Resize 80%--- Resize all layers unchecked.
Layers- Merge- Merge Down
16.
Layers---Duplicate
Image - Mirror - Mirror vertical ( Image - Flip in older versions of PSP)
Layers- Merge- Merge Down
17.
Layers---Duplicate
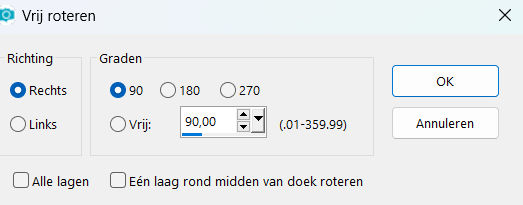
Image---Free rotate---90% right--- Rotate single layer around canvas center unchecked.
18.
Effects-3D-Effects-Drop Shadow with these settings:---0---0--40---80. Color black.
19
Activate the layer underneath—Copy 3 of raster 1
Effects-3D-Effects-Drop Shadow with these settings:------0---0--40---80.
Color black
20.
Activate the top of the layers palette
21.
Open the tube--- deco-19h.png
Edit - Copy-
Activate your work -Edit - Paste as new layer
Objects---Align---Left
Effects-3D-Effects-Drop Shadow with these settings ---0---0--40---80. Color black
22.
Layers---Duplicate
Image - Mirror - Mirror Horizontal (Image - Mirror in older versions of PSP)
23.
Activate the bottom of the layers palette-Raster 1
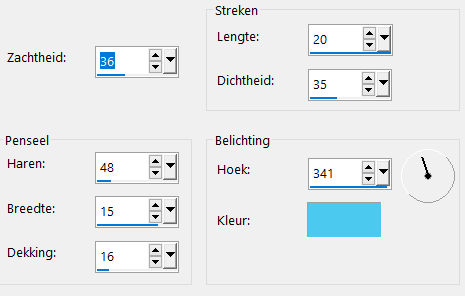
Effects---Art Media Effects---Brush strokes with these settings: —36—48—15—16—20—35—341--- Color -Light color
24.
Adjust-One Step Photo Fix ---Apply
(Do you use other colors---then at your own discretion).
25.
Material Properties-Set your background color to color #ffffff
Layers- New raster layer
Flood Fill Tool- Fill the Layer with color ---#ffffff
26.
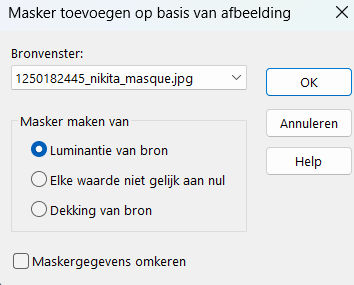
Layers- New Mask Layer- From Image and select Mask 1250182445_nikita_masque
Source Luminance checked
Layers- Merge Merge Group
Layers- Arrange- Move Up
Layers Properties-Reduce the opacity of this layer to 80%.
27.
Activate the bottom of the layers palette=Raster 1
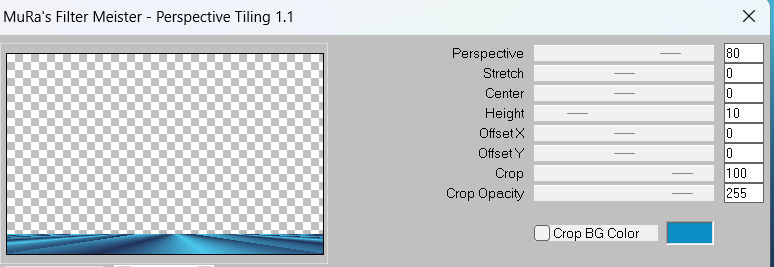
Layers--- Duplicate
Effects---Plugins---Mura`s Meister---Perspective Tiling---Height 10.
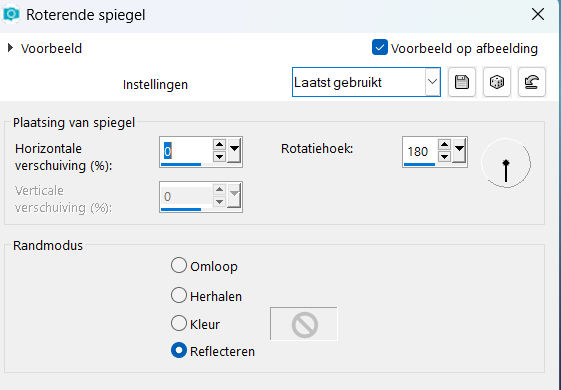
Layers- Arrange- Bring to Top
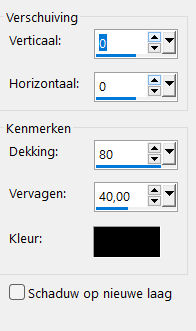
Effects---Reflection Effects---Rotating Mirror use the settings below
Effects- 3D-Effects-Drop Shadow with these settings:------0---0--40---80. Color black
28
Image - Add Borders-Symmetric checked:---1 pixel with your dark color
Image - Add Borders-Symmetric checked:---2 pixels with your light color
Image - Add Borders-Symmetric checked:---1 pixel with your dark color
Selections---Select All
Image - Add Borders-Symmetric checked:---50 pixels (color not important)
Selections---Invert
Material Properties-Set your background color to color #4bc9ef
Flood Fill Tool- Fill the selection with the background color #4bc9ef
29.
Adjust-Add/Remove-Noise-Add Noise
Uniform---20---Monochrome checked.
30.
Selections---Invert
Effects- 3D-Effects-Drop Shadow with these settings:---0---0--40---80. Color black.
Selections---Deselect All
31.
Open the tube ---deco-1
Edit-Copy
Activate your work
Edit-Paste as new layer.
Effects---Image Effects---Offset---0—225-- Transparent---Custom checked.
32.
Open the tube --- hoed-2aa4a.png
Edit-Copy
Activate your work
Edit-Paste as new layer.
Effects---Image Effects---Offset ---0---min 18--- Transparent---Custom checked
Effects- 3D-Effects-Drop Shadow with these settings ---0---0--40---80. Color black
Layers- Merge- Merge All ( flatten)
33.
Effects---Plugins---AAA Frames---Foto Frame—Width---15—0—0—1—0—0—0—100---rest default settings
Add you watermark on new layer.
Save as JPG
Voorbeelden gemaakt en getest door Kamalini---Hennie---Corry---Marion

|