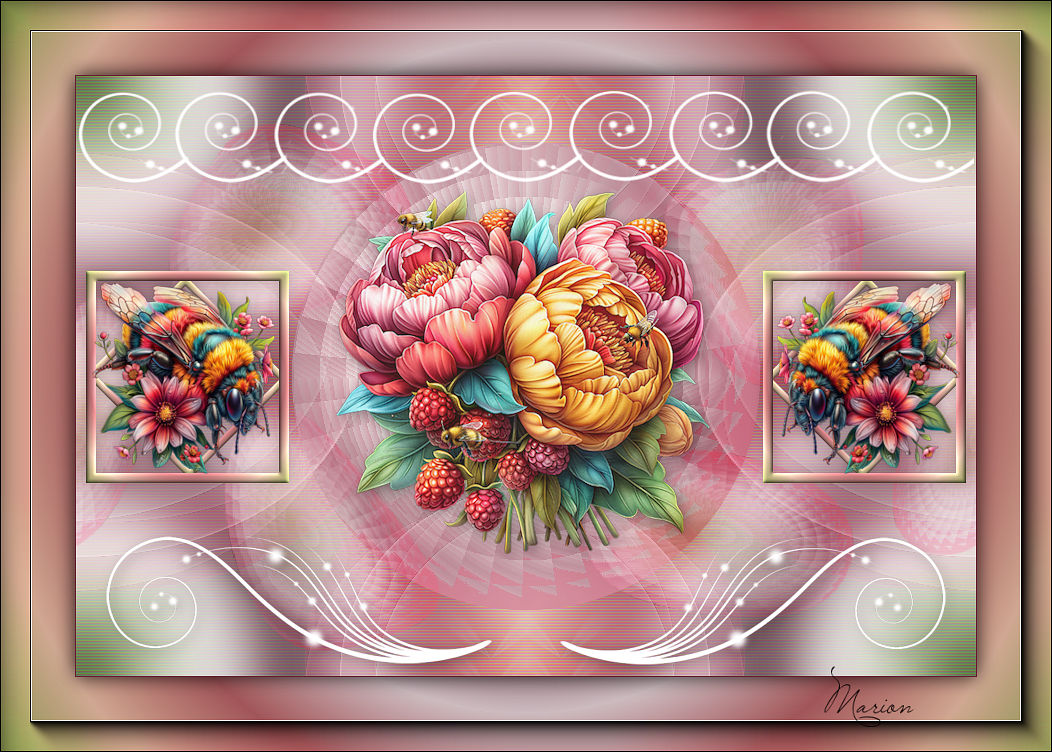
Lesson 174
Translation made by MARION

Supplies
Mieke has used the following filters
Filter—Simple.
Filter---Flaming Pear---Flexify 2.
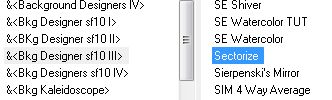
Filter---&<Bkg –Designer sf 10 III > Sectorize.
*****************
Material

Printlesson
Gradient sg_Sweet Pea.jgd ---Place in the gradients folder of your PSP.
- Place the selections in your selection folder of your Psp files
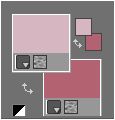
Colors
Foreground color #d6b6c0---Background color #b26271.
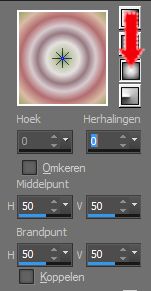
Gradient---sg_Sweet Pea.jgd
Sunburst---Angle x---Repeats 0---Center Point H-50---V-50---Focal Point H 50---V-50.
1.
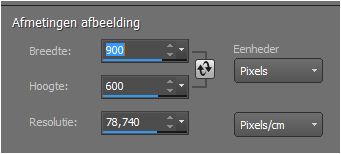
File-Open a new transparent image in this size :
Width---900---Heigth 600 Pixels
2.
2.
Flood fill the layer with the gradient
3.
Adjust---Blur---Gaussian Blur---Radius 25.
4.
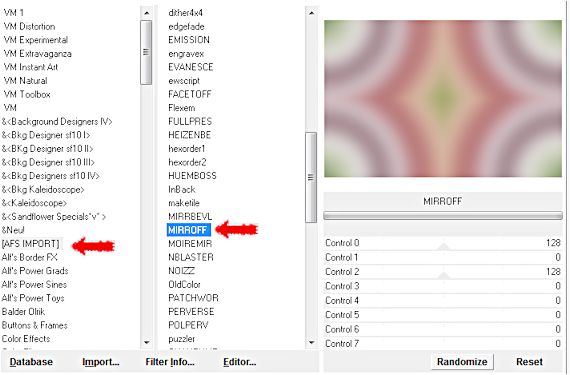
Effects---Plugins—AFS IMPORT---Mirroff.
( if you don't have the filter--image is in the zip)
5.
Layers---Duplicate
6.
Effects---Plugins—Simple---Horizontal Grain.

7.
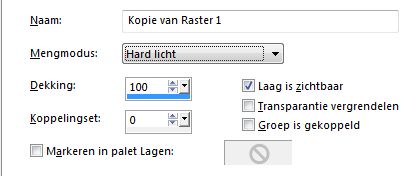
Layers---Properties---Change the blend mode of this layer to Hard Light
8.
Layers--New raster layer.
9.
2.
Flood fill the layer with the gradient
10.
Selections –load/save selection –load selection from disc and select my selection:
sel- mb-174-1.PspSelection.
Selections---Invert
Delete on your keyboard.
11.
Selections---Invert
12.
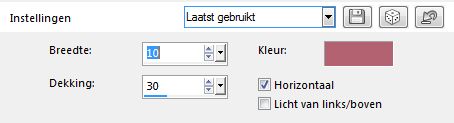
Effects--Texture effects---Blinds---10---30---Dark color---Horizontal checked
13.
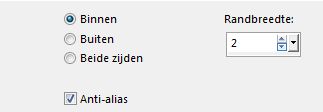
Selections--Modify--Select-Selection Borders--Inside--Anti-alias checked--Border width 2.
14.
Activate Flood Fill Tool----Match Mode none---Flood fill the selection with the dark color

15.
Selections---Select none.
16.
Effects---Plugins---<I C Net Software> Filters in Unlimited 2.0.
& Bkg Designer sf 10 III Sectorize (Do you have another effect?---effect is in the zip).
17.
Layers---Duplicate
18.
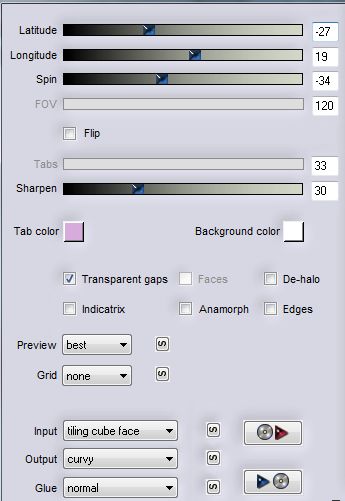
Effects---Plugins---Flaming Pear---Flexify 2
min 27---19---min 34---120---33---30---Tiling cube face---curvy---normal.
19.
Layers---Properties
Change the blend mode of this layer to Luminance (legacy)---Reduce the opacity of this layer to 36%
20.
Selections –load/save selection –load selection from disc and select my selection:
sel- mb-174-2.PspSelection.
Delete on your keyboard.
21.
Selections---Select none.
22.
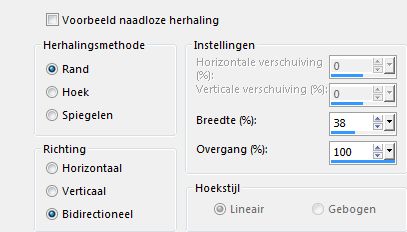
Effects--Image effects--Seamless Tiling
Edge---Bidirectional---38---Transition 100.
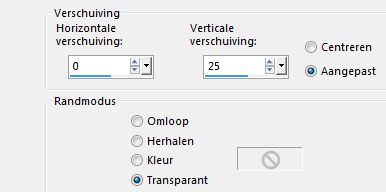
23.
Effects---Image Effects---Offset---0---25---Transparent and Custom checked
24.
Open---Deco 3.
Edit---Copy.
Activate your work -Edit - Paste as a new layer
25.
Layers--New raster layer.
26.
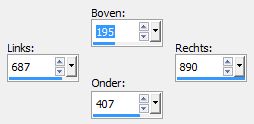
Activate Selection Tool-Custom Selection(S)-Rectangle with these settings:

Top---Left 687---Right 890---Bottom 407.
2.
Flood fill the selection with the gradient
27.
selections---Modify---Contract10 pixels.
Delete on your keyboard.
28.
Selections---Select none.
29.
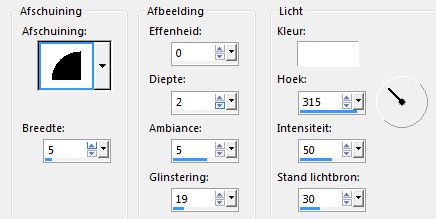
Effects---3D effects--Inner Bevel.
30.
Layers---Duplicate
31.
Image---Resize---69%.
Resize all layers not checked
32.
Image---Free Rotate---Right 45 ( all layers not checked.)
33.
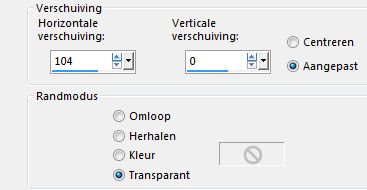
Effects---Image Effects---Offset---104—0---Transparent and Custom checked
34.
Layers--Arrange--Move Down
35.
Open Tube---- 0_a497a_dfaf7b84_L.psd.
36.
Image --- Mirror --- Mirror Horizontal (Image - Mirror in older versions of PSP)
37.
Edit---Copy
Activate your work
38.
Activate Selection Tool-Custom Selection(S)-Rectangle with these settings:
Top---Left 687---Right 890---Bottom 407.
39.
Layers--New raster layer.
40.
Edit--Paste into selection.
41.
Selections---Select none.
42.
Activate the top of the layer palette
43.
Layers--Merge--Merge Down
Repeat---Layers--Merge--Merge Down
44.
Effects---3D effects--Drop shadow---3---3---40---20---Color black.
45.
Layers---Duplicate
46.
Image --- Mirror --- Mirror Horizontal (Image - Mirror in older versions of PSP)
47.
Open---Tube--- 10Flow-0_5099.psd.
48.
Edit---Copy.
Activate your work -Edit - Paste as a new layer
49.
Image---Resize---70%.
Resize all layers not checked
50.
Layers---Properties---Reduce the opacity of this layer to 90 %
51.
Effects---Edge Effects---Enhance
52.
Effects---3D effects---Drop shadow 3---3---40---20. Color black.
53.
Open---Deco 1
Edit---Copy
Activate your work -Edit - Paste as a new layer
54.
Effects---Image Effects---Offset---0---min 225---Transparent and Custom checked
55.
Effects---3D Effects--- Drop Shadow 3---3---40---20. Color black.
56.
Open---Deco 2
Edit---Copy
Activate your work -Edit - Paste as a new layer
57.
Effects---Image Effects---Offset---0---240---Transparent and Custom checked
58.
Layers---Properties---Change the blend mode of this layer to Screen
59.
Image--Add borders---1 pixels with your dark color.
60.
Image--Add borders---75 pixels --- Color white #ffffff.
61.
Activate your Magic Wand / Tolerance at 0 and Feather at 0---
Click with the magic wand in the 75 pixel border.
Flood fill the selection with the gradient
62.
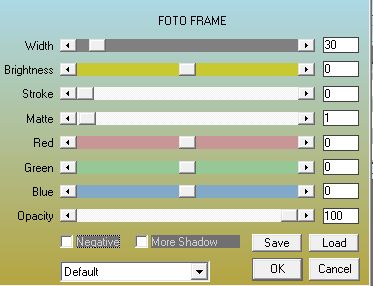
Effects---Plugins---AAA Frames---Foto frame---30---0---0---1---0---0---0---100.
63.
Selections---Invert
64.
Effects---3D effects--- Drop shadow 0---0---80---30. Color black.
65.
Selections---Select none.
66.
Image--Resize ---900 pixels---Resize all layers---checked.
67.
Layers--New raster layer
Place your watermark
Save as JPG.
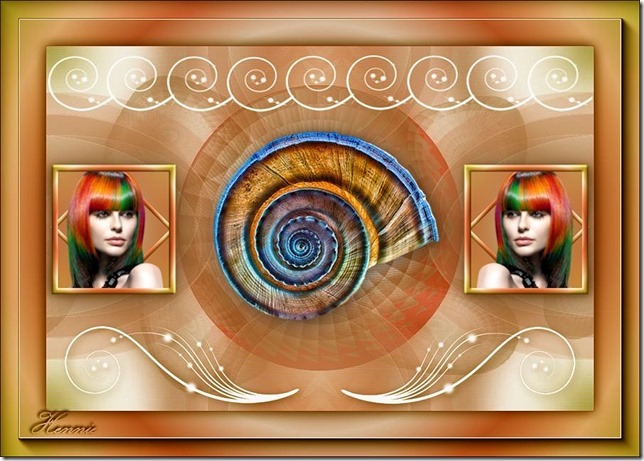
Have fun with this lesson
Greetings Mieke
Examples created by Kamalini
 

|


