Lesson-153
Translation made by MARION

Supplies
Mieke has used the following filters
Filter---<I. C.Net Software> Filters in Unlimited
&<BKG-Designer sf10 II>---Lines Panel Stripes
Filter---<I C Net Software> Filtersin Unlimited 2.0>Simple
AAA Frames---Foto Frame
Materials

Print-les
@qua22.PspStyledLine----Place in ---the Styled Line folder of psp
Tube`s and Mask in a folder of your choise
Colors
Foreground color #482f29---Background color #e9e1cd
Gradient Radial---0---0---Horizontal 50---Vertical100.

 You can use my arrow to follow your work
1.
File--New
Open a new transparent image in this size: Heigth 800---550 Width
Flood fill the layer with the gradient
2.
Layers---Duplicate
3.
Image---Resize ---80%
Resize all layers not checked
4.
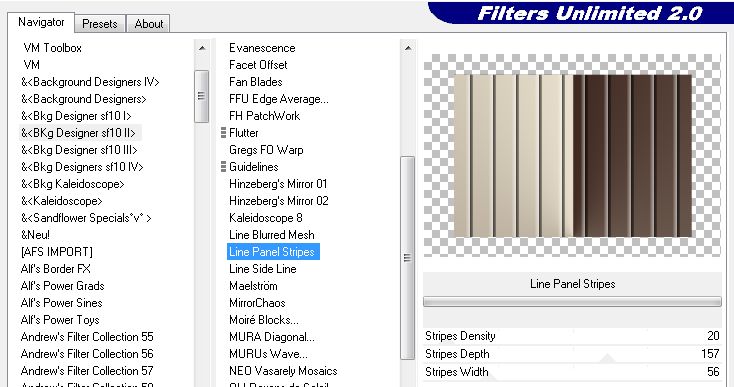
Effects---Plugins
Filter---<I. C.Net Software> Filters in Unlimited---&<BKG-Designer sf10II>
Lines Panel Stripes
5.
Layers---Duplicate
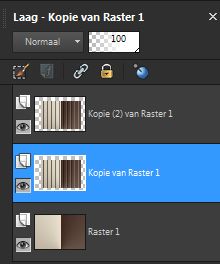
6.
In your layers palette, activate---the middle layer---.(Copy of Raster 1.)
7.
Layers---Merge---Merge Down
8.
Activate the top in the layer palette
(Copy (2)of Raster 1)
9.
Effects---Plugins---<I. C.Net Software> Filters in Unlimited---&>
Simple---Horizontal Grain
Should you get an abnormal result when using this filter
then you can use tube---Simple-Horizontal-Grain -------Image in the zip.
10.
Layers---Duplicate
11.
Effects---Plugins---<I. C.Net Software> Filters in Unlimited---&>
Simple---Pizza Slice Mirror
Edit--Repeat -Filters unlimited 2.0---Apply
Edit--Repeat- Filters unlimited 2.0---Apply
12.
Activate your Magic Wand - Tolerance at 0 and Feather at 0
Click on the four angled surfaces.
13.
Selections---Invert
Delete on your keyboard.
14.
Selections---Invert
Flood fill the selections with your light background color.
15.
Selections---Select none
16.
Effects---3D-effects
Drop Shadow ---2---2---50---80---Color black.
17.
Layers---Duplicate
Lock this layer in your layers palette.
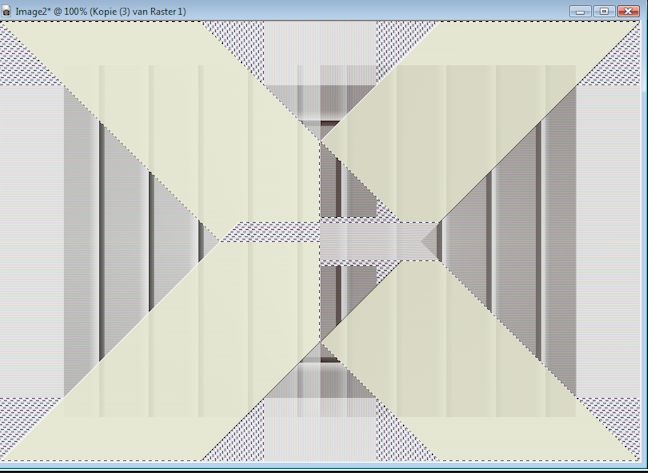
Activate ---Copy (3) of Raster 1.
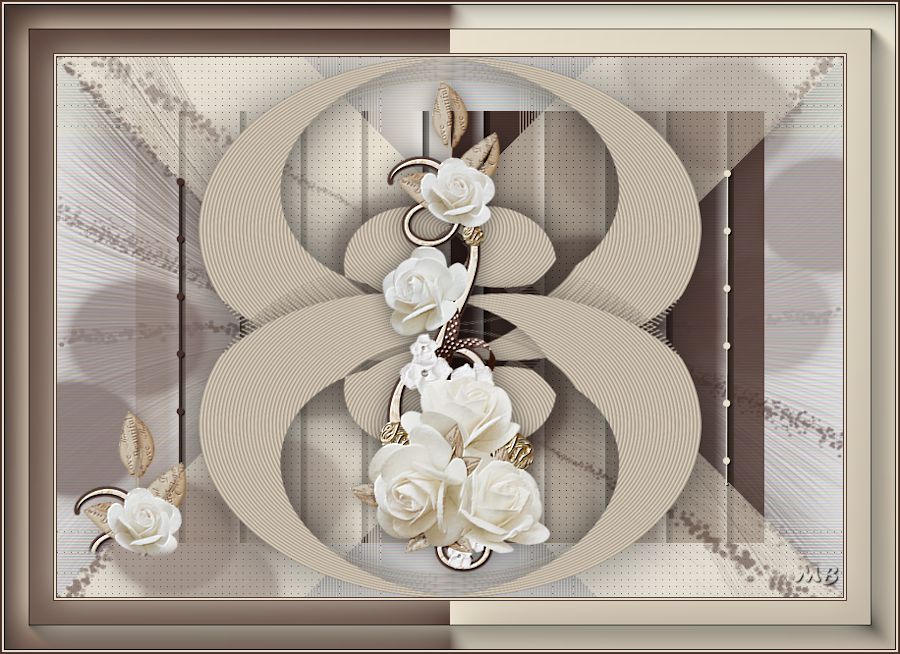
The result
18.
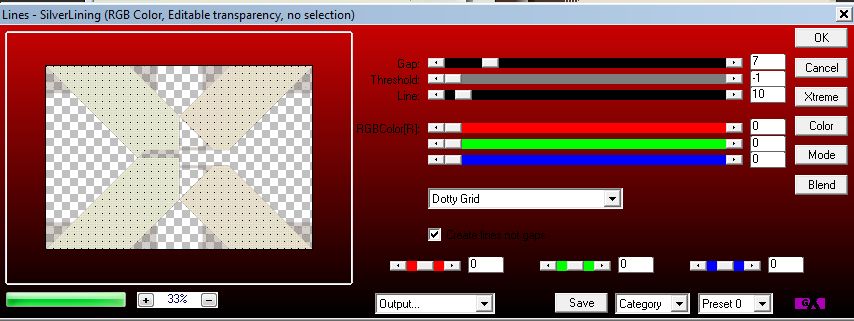
Effects---Plugins---Filter Ap 01 [innovations]
Lines-Silverlining---7---min1---10---0---0---0.
19.
Layers-Properties-Reduce the opacity of this layer to 61
Other tube? Play with the blend mode and colors
20.
In your layer palette, open the top layer ---and activate
21.
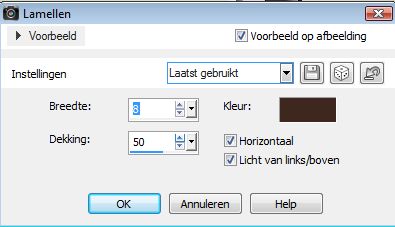
Effects--Texture effects
Blinds---8---50---Dark color
Horizontal and Light from left/upper---checked.
22.
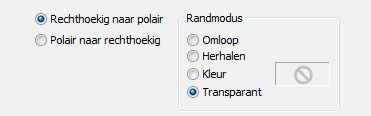
Effects--Distortion Effects--Pole coordinates
Rectangular to polar---Transparent checked.
23.
Image---Resize ---80%
Resize all layers not checked
Edit---Repeat ---Resize
24.
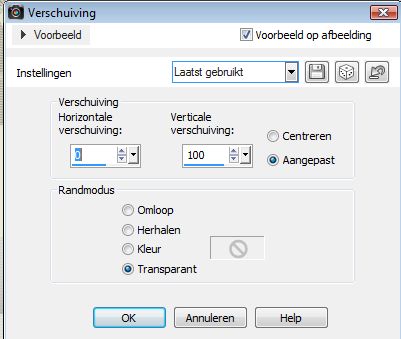
Effects---Image effects
Offset ---0---100---Transparent and Custom checked
25.
Layers---Duplicate
26.
Image -- Mirror --Mirror vertical ( Image-Flip in older versions of PSP)
27.
Layers--Merge--Merge Down
28.
Effects---3D-effects
Drop Shadow ---2---2---50---80---Color black.
29.
Layers--New raster layer
Flood fill the layer with the dark color
30.
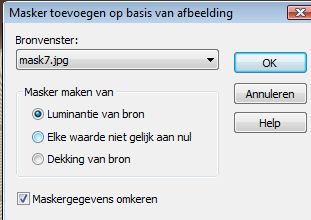
Layers--New mask layer--From image and select ---Mask7.jpg.
Invert mask data checked
31.
Layers---Merge---Merge Group
32.
Layers---Arrange---Move Down
33.
Activate the top of the layer palette
34.
Activate Pen Tool with these settings ---Lijnstijl@Qua22---Width 2

Set your foreground color to your dark color
With the shift button pressed draw a line on the left
See finished image
In your layers palette---set your foreground color to your light color
With the shift button pressed, draw a line to the right---See finished image
35.
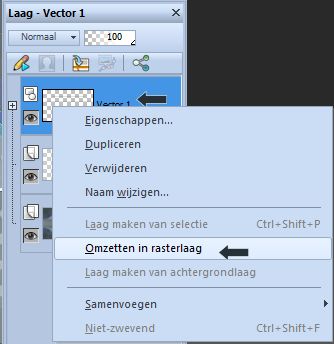
In your layer palette--Vector layer----Convert to raster layer
36.
Effects---3D-effects
Drop Shadow ---1---1---100---50---Color black.
37.
Open Tube---Flor-81
Edit---Copy
Activate your work ---Edit-Paste as new layer.
Do not move
38.
Effects---3D-effects
Drop Shadow ---0---0---50---30---Color black.
39.
Open---Tube--- takje-flor-2
40.
Edit---Copy
Activate your work ---Edit-Paste as new layer.
41.
Effects---Image effects
Offset ---min 326---min 170
42.
Effects---3D-effects
Drop Shadow ---0---0---50---30---Color black.
43.
Image--Add borders 1 pixel--Dark color
Image--Add borders 2 pixels--Light color
Image--Add borders 1 pixel--Dark color
Image--Add borders 50 pixels--Light color.
44.
Activate your Magic Wand - Tolerance at 0 and Feather at 0
Select the border with the 50 pixels
Turn the colors in your materials
Foreground Properties - Set your foreground to gradient
Flood fill the layer with the gradient
.
45.
Effects---Plugins---AAA Frames---Foto frame use the settings below.

46.
Selections---Invert
47.
Effects---3D- effects
Drop Shadow ---0---0---80---50---Light color.
48.
Selections---Select All
49.
Selections---Modify---Contract 25 Pixels
50.
Effects---3D -effects
Drop Shadow ---0---0---80---50---Light color.
51.
Selections---Select none
52.
Image--Add borders---2x pixels---Dark color
53.
Layers--New raster layer
Place your watermark
Layers--Merge--Merge All (flatten)
Save as JPG
Enjoy this lesson
Greetings Mieke
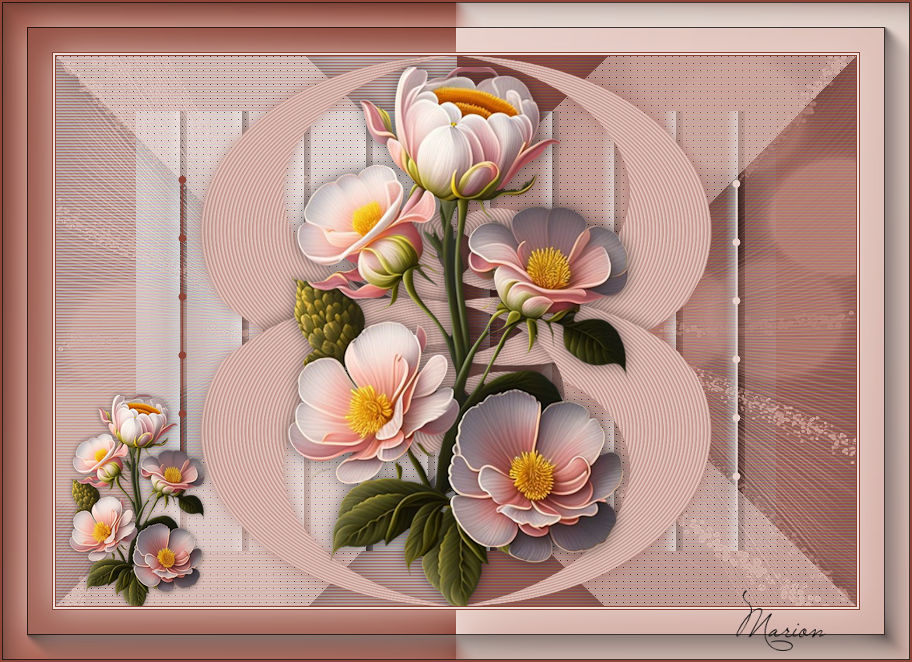
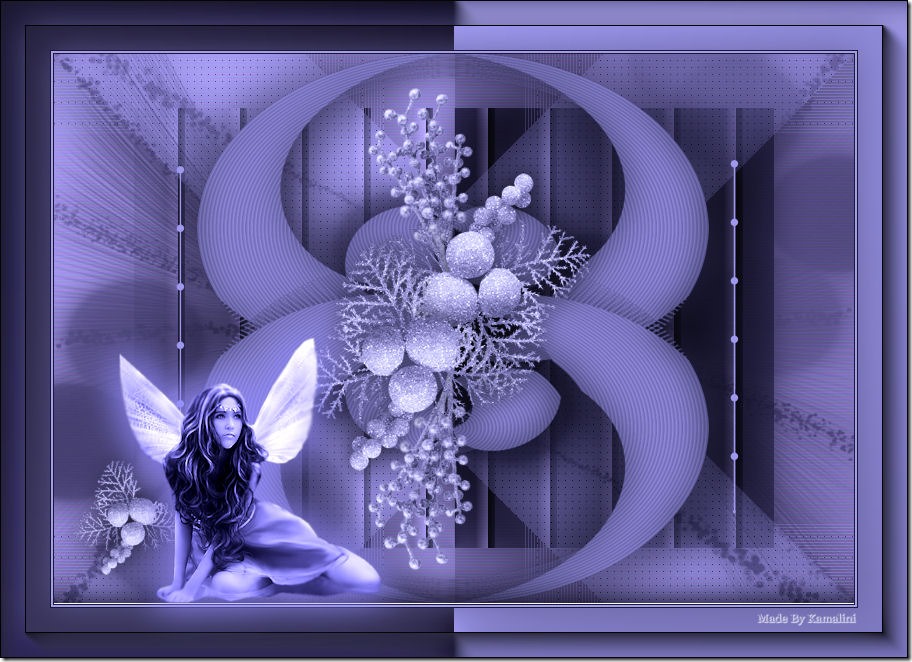
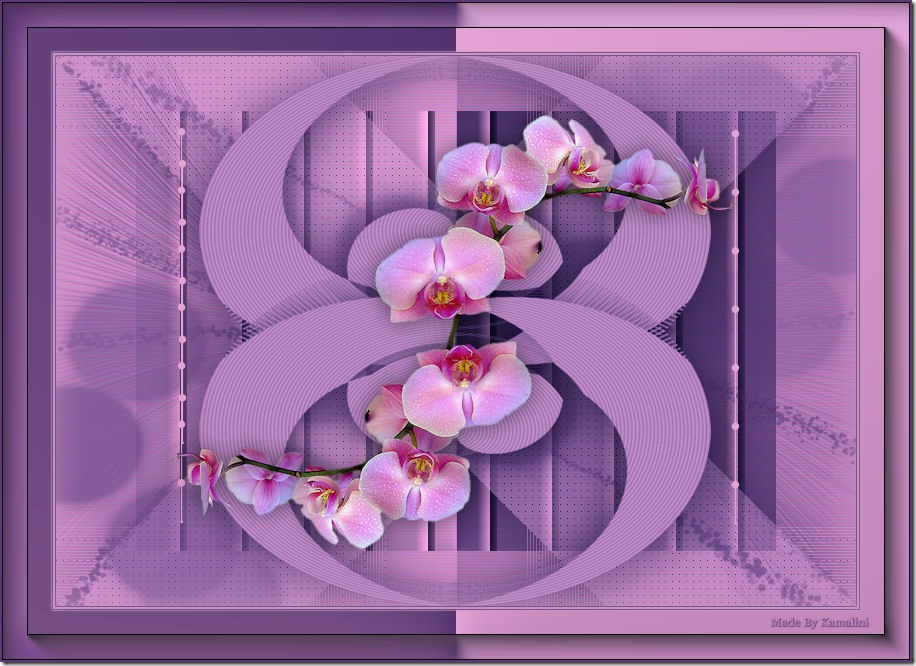
Examples created by Kamalini

|