Christmas lesson-5-2015
Translation made by MARION

Supplies
Material

Printlesson

Plugins
Filter---Mura`s Meister---Cloud
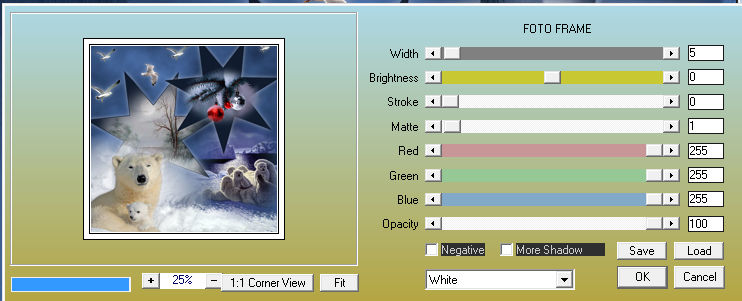
Filter---AAA Frames---Foto Frame
Colors
Gradient
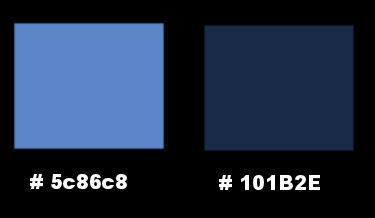
Replace your foreground color with a Foreground/Background
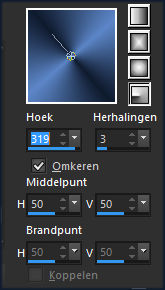
Radial---Gradient ---Angle 319---Repeats 3---Horizontal 50---Vertical 50.
Center point H 50 ---Middle point V 50.
 You can use my arrow to follow your work
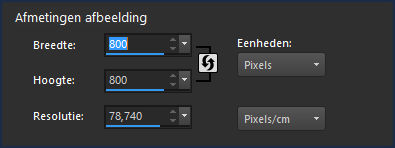
1.
File-Open a new transparent image in this size :
Width 800---Height 800 Pixels.
2.
Flood fill the layer with the gradient
3.
Effects---Plugins---Mura`s Meister---Cloud---Default

4.
Open ---Tube---Sneeuw.
Edit---Copy
Activate your work -Edit - Paste as new layer
5.
Move the snow down against the bottom
Or----do this
(Objects---Align---Bottom).
6.
Open---Misted tube--- ijsbeertjes---3
Edit---Copy
Activate your work -Edit - Paste as new layer
7.
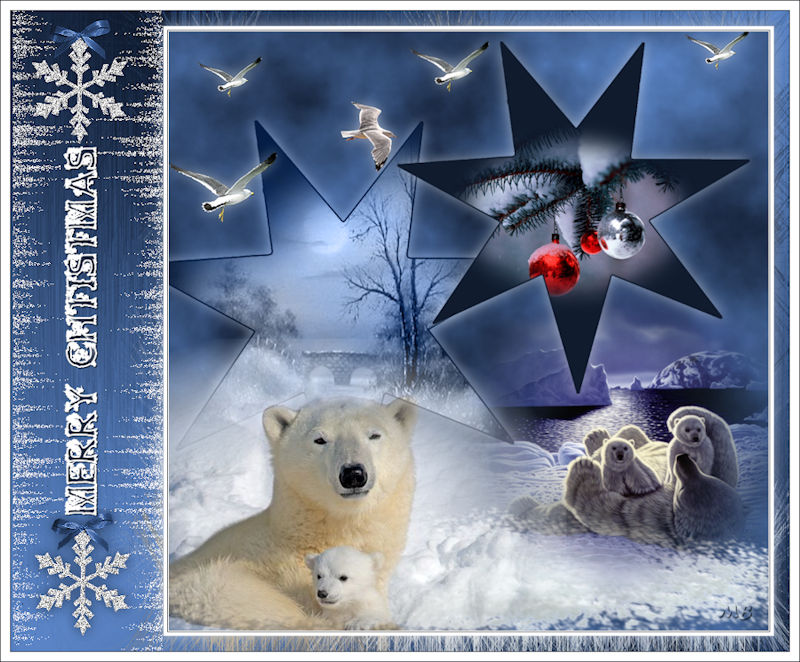
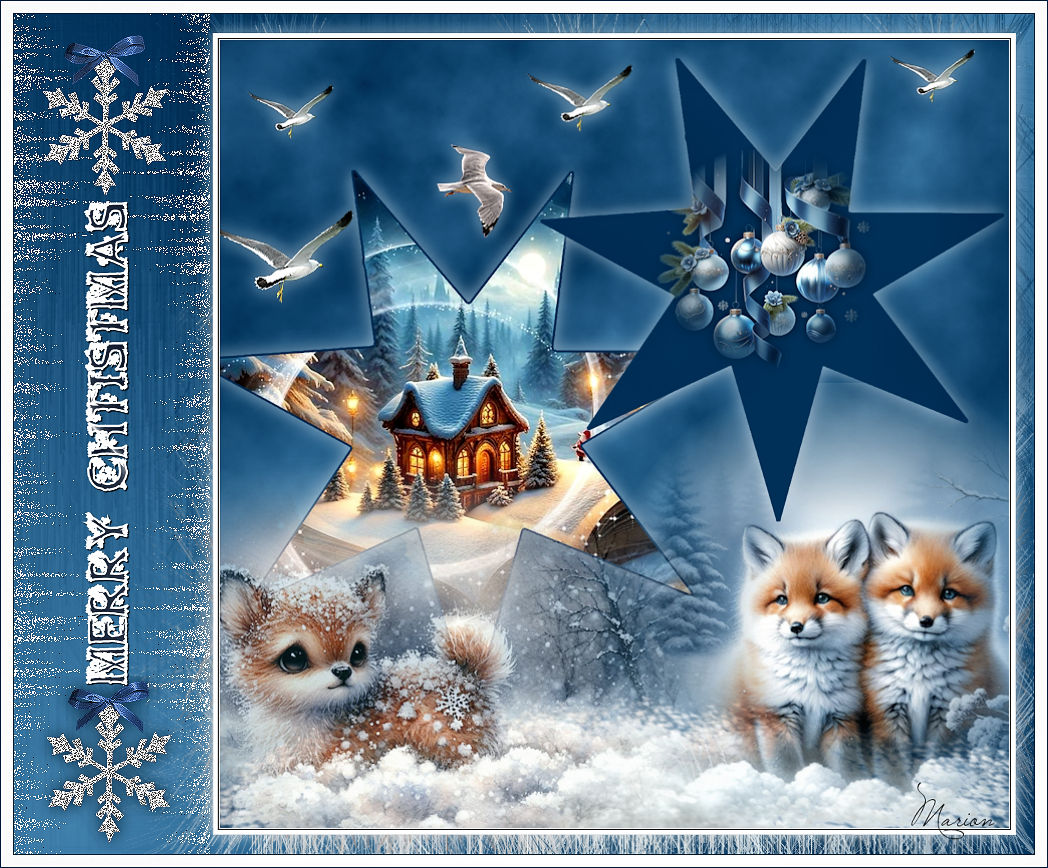
Move it to the bottom right---See finished image
8.
Layers---New raster layer
Flood fill the layer with the background color.
9.
Open--- masker-ster-mb.jpg--- Click on the minus sign in the upper right corner.
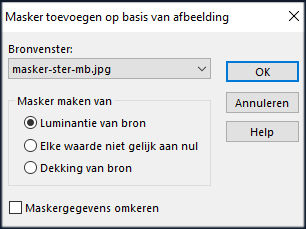
10.
Layers--New mask layer--From image---Select ---masker-ster-mb.jpg
Luminance of source checked.
11.
Layers---Merge---Merge Group
12.
Selections---Select All--- Selections---Float
13.
Selections---Modify---Contract---3 pixels
14.
Open---Misted tube--- Cherokee_MistyBridge
15.
Edit---Copy---Edit---Paste into Selection
16.
Adjust---Sharpness---Sharpen
17.
Selections---Select none
18.
Image--Resize--70 %---
resize all layers not checked
Layers---Properties---Set the Blend Mode to Luminance ( legacy)
19.
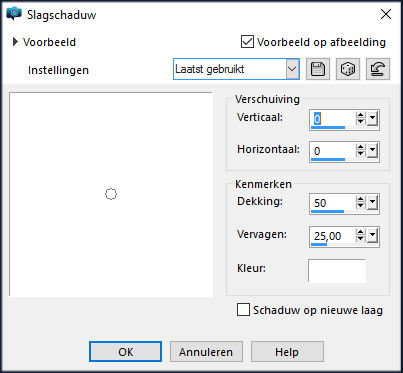
Effects---3D-effects--- Drop Shadow 0---0---50---25. Color white
Move---to the bottom left---See finished image
20.
Layers---New raster layer
Flood fill the layer with the background color.
21.
Layers--New mask layer--From image---Select ---masker-ster-mb.jpg
Luminance of source checked.
22.
Layers---Merge---Merge Group
23.
Selections---Select All--- Selections---Float
24.
Selections---Modify--Contract--3 pixels
25.
Open---Misted tube---f104fdaa.
Edit---Copy
Activate your work -Edit - Paste as new layer
26.
Selections---Invert
Delete on your keyboard.
Selections---Select none
27.
Layers---Merge---Merge Down
28.
Image---Resize---60 %.
resize all layers not checked
29.
Move--to the top right---See finished image.
Effects---3D-effects--- Drop Shadow 0---0---50---25. Color white
30.
Open---Misted tube--- tube-animaux-2-by-candice-1
Edit---Copy
Activate your work -Edit - Paste as new layer
31.
Move to bottom left---See finished image
Activate in your layer palette--Group Raster 4.
Activate your eraser and clean up the head of the Ice Bear.
32.
Open Tube ---kerst-deco-1-5-2015
Edit---Copy
Activate your work -Edit - Paste as new layer
Move up---See finished image
33.
Effects---3D-effects--- Drop Shadow0---0---50---25. Color white
You can now move the layers on your image
Is all in place?
34.
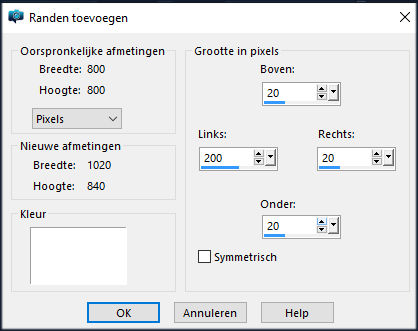
Image ---Add borders---
Left 200---Top 20---Right 20---Bottom 20.---Symmetrical not checked.
35.
Activate your Magic Wand --- Tolerance at 0 and Feather at 0---select---the white border.
36.
Flood fill the selection with the gradient
37.
Effects--Texture effects---Fur---V 25---D 72---L 100---T. 75

38.
Selections---Invert.
39.
Effects---Plugins---AAA Frames---Foto Frame
5-0-0-1-255-255---255—100-- White
40.
Effects---3D-effects--- Drop Shadow 0---0---50---25. Color white.
41.
Selections---Select none
42.
Open--- kerst-deco-2-5-2015
Edit---Copy
Activate your work -Edit - Paste as new layer
Pick Tool: (K) on your keyboard ---Position X 3.00---Position Y min 37.

Press the ( M ) button to close the tool.
43.
Open---kerst-deco-3-5-2015.
Edit---Copy
Activate your work -Edit - Paste as new layer
Pick Tool: (K) on your keyboard ---Move to the left.
Press the ( M ) button to close the tool.
(Or write your own text.)
44.
Image - Add Borders-Symmetric checked:---1 pixel-- with your dark color
Image - Add Borders-Symmetric checked:---12 pixels-- with #ffffff (white)
Image - Add Borders-Symmetric checked:---1 pixel-- with your dark color
45.
Place your watermark on a new layer.
46.
Layers--Merge--Merge All (flatten)
47.
Image---Resize---900 pixels width---
Resize all layers checked
Save as JPG
Enjoy this lesson.
Mieke

Examples created by Kamalini and Hennie
|


